
Metal Roof Leak Repair Guide (Tools, Process, & More)
 7.22.24
 8 minutes read
Metal roofs are a popular choice for many homeowners and commercial property owners due to their durability, longevity, and aesthetic appeal. However, like any roofing material, they can develop leaks over time. Understanding how to repair these leaks can save you from costly damage and extend the life of your roof. This comprehensive guide will walk you through the tools needed, the step-by-step metal roof leak repair process, and more, including:
- Understanding metal roof leaks
- Tools and materials needed
- 8 step repair process
- Preventative maintenance tips
- When to call a professional
🤔 Understanding Metal Roof Leaks

Before diving into the repair process, it’s crucial to understand the common causes of metal roof leaks:
- Corrosion: Over time, metal roofs can corrode, especially if the protective coating wears off.
- Improper Installation: Faulty installation can lead to gaps and loose screws, allowing water to seep in.
- Weather Damage: Extreme weather conditions like hail, heavy snow, or strong winds can damage the roof.
- Aging: As the roof ages, the materials can deteriorate, leading to leaks.
- Penetrations: Areas around vents, chimneys, and skylights are particularly susceptible to leaks.
🔨 Tools and Materials Needed
Before starting the repair, gather the necessary tools and materials:
- Safety Gear: Gloves, safety glasses, and a harness (if working on a steep roof).
- Ladder: Ensure it’s stable and reaches the roof safely.
- Sealant: A high-quality, roof-specific sealant.
- Roofing Screws: To replace any damaged or missing screws.
- Metal Patches: For larger holes or corroded areas.
- Wire Brush: To clean the corroded areas.
- Caulking Gun: For applying the sealant.
- Putty Knife: To spread the sealant.
- Roofing Tape: To cover small holes and seams.
- Paint: Matching the roof color, to cover repaired areas.
🛠️ 8 Step Repair Process
Our meticulous 8 Step Repair Process ensures that your metal roof leak is identified and repaired with precision. Each step is designed to address key aspects of the repair, from assessment to final inspection. Here’s a closer look at how we restore the integrity of your metal roof.
1. Safety First
Before starting any roof repair, ensure your safety as a top priority. Begin by wearing appropriate safety gear, including a hard hat, non-slip shoes, and gloves. Use a stable, well-anchored ladder to access the roof safely. If the roof is steep or slippery, consider using a harness and secure it to a solid anchor point. Additionally, make sure the weather conditions are suitable for roof work—avoid repairs during rain, snow, or high winds.
- Inspect your tools and materials beforehand to ensure they are in good condition.
- Take your time to set up a safe workspace.
Taking these precautions can help prevent accidents and ensure a smoother repair process.
2. Identify the Leak Source
Locate the exact source of the leak. This task can be quite detailed and may require a thorough inspection. Start by examining the attic for any visible water stains or damp spots. Once identified, track these signs back to their origin on the roof. It’s important to note that water can travel along structures before it becomes visible, so the source might not be directly above the stain.
- Common areas where leaks occur include seams where different sections of the roof meet, joints where roofing materials overlap, and around penetrations such as chimneys, vents, or skylights.
3. Clean the Area
Once the leak source is identified, clean the area thoroughly. Use a wire brush to remove any rust or debris. This ensures the sealant adheres properly. Allow the area to dry completely before applying the sealant.
4. Apply Roofing Tape (For Small Holes)
For small holes and seams, apply roofing tape to ensure a secure and weather-resistant seal:
- Begin by thoroughly cleaning the area around the hole or seam to remove any dirt, debris, or moisture.
- Cut a piece of roofing tape that extends slightly beyond the edges of the hole or seam to provide adequate coverage.
- Carefully position the tape over the hole or seam and press it firmly onto the cleaned surface, using a roller or your hand to smooth it out.
- Eliminate any air bubbles or gaps that could compromise the effectiveness of the seal.
- For added durability, consider applying an additional layer of tape or using a sealant around the edges to maintain the integrity of your repair and protect against future leaks or damage.
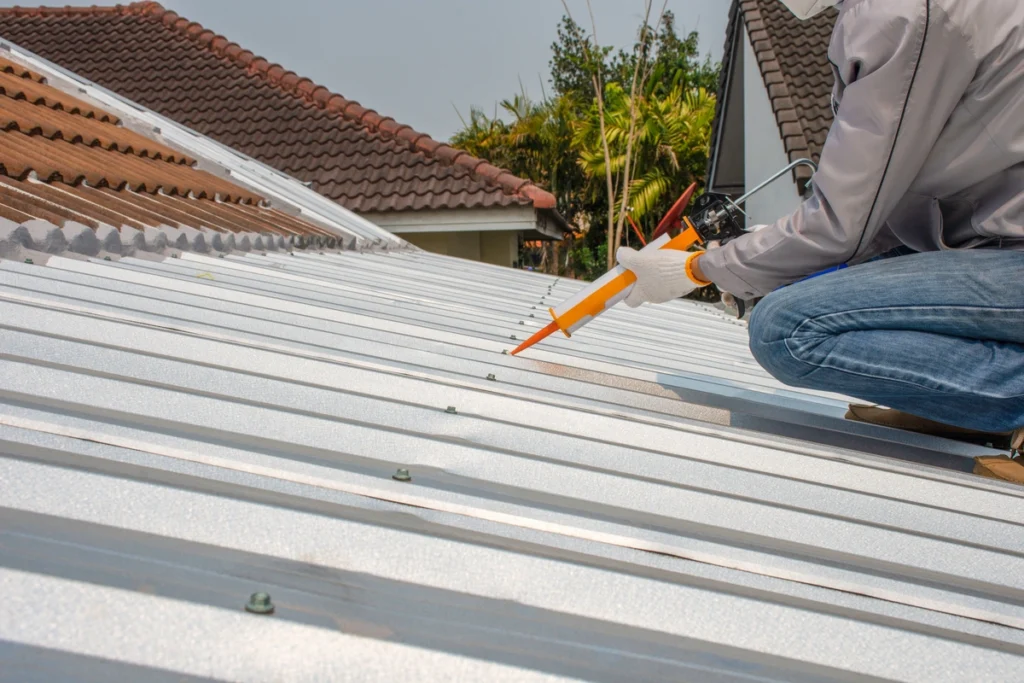
5. Seal with Sealant
For larger cracks or gaps in your roof, use a high-quality roofing sealant to ensure a durable and long-lasting repair.
- Begin by thoroughly cleaning the affected area to remove any debris, dirt, or loose materials.
- Once the surface is clean and dry, apply the roofing sealant generously over the crack or gap using a caulking gun.
- Make sure to load the caulking gun properly and apply steady pressure to achieve an even flow of sealant.
- After applying a sufficient amount of sealant, use a putty knife to spread it evenly across the entire affected area.
- Ensure the sealant is smoothed out and covers the entire crack or gap completely, without any missed spots.
- Allow the sealant to cure according to the manufacturer’s instructions before exposing the area to weather conditions.
- Regularly inspect the repaired area to ensure the sealant remains intact and effective over time.
6. Patch Large Holes
For large holes or corroded areas, use metal patches. Cut a patch slightly larger than the damaged area. Apply sealant around the edges of the patch and place it over the hole. Press firmly and add roofing screws to secure it. Apply another layer of sealant around the edges of the patch to ensure it’s watertight.
7. Replace Damaged Screws
Inspect the screws around the leak area carefully. Look for any screws that are damaged, rusted, or missing entirely. If you find any that are in poor condition, replace them with new roofing screws that are specifically designed for this purpose. Make sure to choose screws that are the appropriate size and material for your roofing type. Once you have the new screws, use the proper tools to ensure they are tightly secured, providing a firm and watertight seal to prevent future leaks. Additionally, check the surrounding area for any other potential issues and address them as needed to maintain the integrity of the roof.
8. Paint the Repaired Area
Once the sealant and patches are dry, paint the repaired areas to match the rest of the roof. This not only improves the appearance, making the roof look as good as new, but also adds an extra layer of protection. The paint acts as a barrier against weather elements such as rain, snow, and UV rays, helping to prevent future damage and prolong the life of the repairs. Additionally, a well-maintained roof can enhance the overall curb appeal of your home and contribute to its value. Taking the time to ensure a seamless finish will provide peace of mind and ensure the durability and longevity of your roofing work.
💡 Preventative Maintenance Tips
To avoid future leaks, regular maintenance of your metal roof is essential:
- Regular Inspections: Inspect your roof at least twice a year and after severe weather. Look for signs of wear, corrosion, and loose screws.
- Clean Gutters: Ensure gutters are clean and free of debris. Clogged gutters can cause water to back up and damage the roof.
- Trim Overhanging Branches: Overhanging branches can damage the roof during storms and provide a pathway for pests.
- Check Sealants: Regularly check the condition of the sealants around roof penetrations and reapply if necessary.
- Remove Debris: Remove leaves, twigs, and other debris from the roof surface to prevent water buildup and corrosion.
👨🔧 When to Call a Professional
While many metal roof leaks can be repaired by homeowners, there are situations where it’s best to call a professional:
- Severe Damage: If the roof has extensive damage or multiple leaks, professional repair is recommended.
- Safety Concerns: If you’re not comfortable working at heights or on a steep roof, hire a professional.
- Warranty Issues: If your roof is under warranty, check the terms. DIY repairs may void the warranty.
🙌 Expert Metal Roof Leak Repair by Kenneth Daniel Roofing
Repairing a metal roof leak requires the right tools, materials, and a methodical approach. At Kenneth Daniel Roofing, our experienced team is equipped to address leaks promptly and effectively, ensuring the longevity and performance of your metal roof. With our commitment to regular maintenance and timely repairs, we help prevent leaks and protect your property from water damage. Trust the experts at Kenneth Daniel Roofing to get the job done safely and correctly. Contact us today for a consultation and let us take care of all your roofing needs!
EXPLORE OUR RECENT ARTICLES

We’re Redefining Roofing. You In?
