
How to Repair Gutter Seams (Prevent Leaks, Clogs, & More)
 11.22.24
 8 minutes read
Gutters play a vital role in our homes by directing water away from our foundations and preventing damage. However, when gutter seams start to leak, they can quickly turn into a homeowner’s nightmare. The good news is that repairing gutter seams is a task you can handle on your own! In this blog post, we’ll guide you through everything you need to know about how to repair gutter seams, including:
- Understanding gutter seams and their significance
- Preparing for the repair
- Step-by-step guide to repairing gutter seams
- Tips for maintaining your gutters
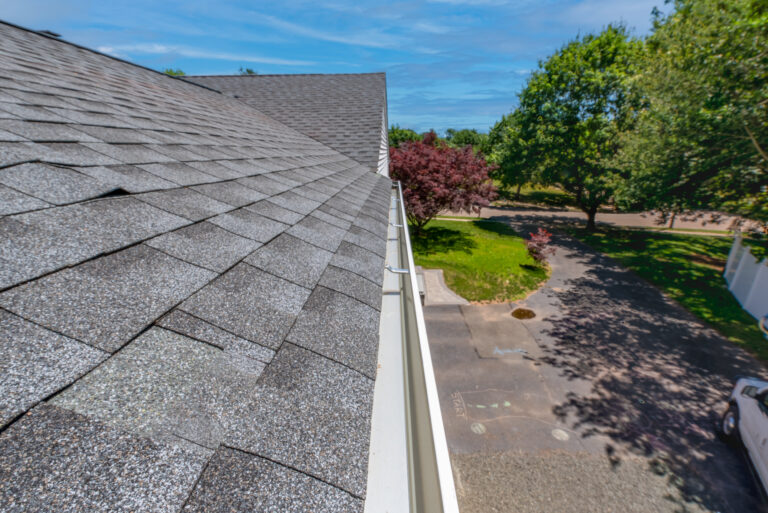
🤔 Understanding Gutter Seams

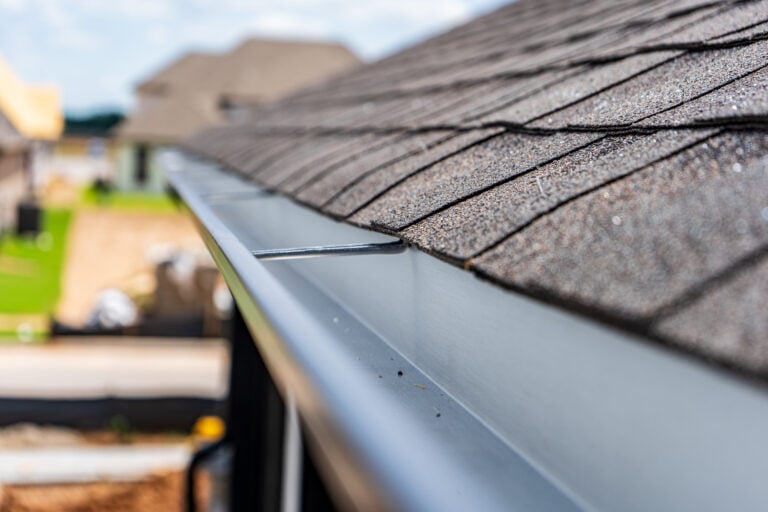
Gutter seams are the points where two sections of the gutter meet. These joints are crucial for the proper functioning of the gutter system. When the seams are intact, they create a continuous channel that efficiently directs rainwater away from your home. However, if a seam becomes compromised, it can lead to leaks and water damage.
Gutters come in various materials, including aluminum, vinyl, and copper. While each material has its unique benefits, they all share the vulnerability of seam leaks. Over time, exposure to the elements can cause seams to weaken and allow water to escape.
Addressing gutter seam issues promptly is essential for preserving your home’s structural integrity. Ignoring leaks can result in costly repairs down the line. Understanding the importance of gutter seams is the first step in ensuring your gutter system works effectively.
Common Causes of Gutter Seam Leaks
Several factors can contribute to gutter seam leaks, including:
- Debris Accumulation: Leaves and twigs can create blockages, putting pressure on the seams and leading to leaks over time.
- Weather-Related Wear and Tear: Extreme temperatures, heavy rain, and strong winds can weaken gutter seams, while fluctuating temperatures cause materials to expand and contract.
- Improper Installation or Low-Quality Materials: Gutters that are not installed correctly or made from subpar materials may be prone to seam leaks.
Identifying the root cause of the problem is essential for effective repairs.
👉 Preparing for the Repair
Before you start repairing your gutter seams, it’s essential to take some preparatory steps. Safety should be your top priority, so ensure you have a stable and secure ladder. It’s also a good idea to have a friend or family member assist you, especially if you’re working at heights.
Begin by clearing away any debris from the gutters. Use the gutter scoop or trowel to remove leaves, twigs, and any other obstructions. This step ensures that you can access the seams easily and apply the sealant effectively.
Next, inspect the seams thoroughly. Look for any visible damage or corrosion. If you notice any loose fasteners or brackets, tighten them to ensure the gutter is secure. Cleaning the seams with a wire brush or sandpaper will help the sealant adhere properly. Taking these preparatory steps will make the repair process more effective.
Tools and Materials You’ll Need
Before you begin repairing your gutter seams, gather the necessary tools and materials. Having everything on hand will make the process smoother and more efficient.
You’ll need:
- A sturdy ladder to reach the gutters safely
- A gutter scoop or small trowel to remove debris
- A hose with a spray nozzle and a bucket for cleaning
- A wire brush or sandpaper to clean the seams
In terms of materials:
- A high-quality gutter sealant compatible with your gutter material
- A caulking gun for even application
Having these tools and materials prepared will set you up for a successful repair.
🛠️ 7 Steps to Repair Gutter Seams

Repairing gutter seams is crucial to prevent water leaks that can lead to structural damage and costly repairs. Properly maintained gutters ensure effective drainage, protecting your home from water-related issues and extending the lifespan of your roofing system.
1. Clean and Dry the Seam
Start by thoroughly cleaning the seam to ensure that the new sealant adheres properly. Use a wire brush or sandpaper to scrub away any dirt, rust, or old sealant that may be present. Pay special attention to any areas where debris has built up, as this can lead to moisture retention and further deterioration. After scrubbing, rinse the seam with a hose to wash away any loose debris and dust. Once you’ve completed the washing, be sure to dry the area completely using a cloth or let it air dry, as applying sealant to a wet surface can compromise its effectiveness.
2. Apply Gutter Sealant
Next, prepare to apply gutter sealant. Load your caulking gun with a high-quality gutter sealant specifically designed for outdoor use. When applying the sealant, use a steady hand to create a generous bead along the entire length of the seam, ensuring you cover any gaps or cracks. It’s important to ensure complete coverage, as any exposed areas can lead to leaks. Once the sealant is applied, smooth it out using a putty knife or your finger to create an even surface. This not only enhances the appearance but also helps to ensure a secure bond.
3. Allow Sealant to Cure
After applying the sealant, it’s crucial to allow it to cure properly according to the manufacturer’s instructions. This process typically takes between 24 to 48 hours, depending on the type of sealant used and environmental conditions. During this curing period, avoid exposing the sealant to water. Keeping it dry is vital to achieving a reliable, long-lasting seal that will withstand the elements.
4. Inspect for Leaks
Once the sealant has fully cured, it’s time to check your work. Inspect the seam for any leaks by running water through the gutter system. Observe carefully for any drips or signs of moisture escaping from the seam. It’s advisable to conduct this test during a light rain or by using a hose on a low setting to simulate rainfall conditions. This proactive step ensures that any issues are caught early, allowing you to address potential leaks before they become serious problems.
5. Reinforce the Seam
If you detect any leaks during your inspection, it’s important to reinforce the seam. You can do this by adding more sealant or using a specialized patch designed for gutters. If you choose to apply more sealant, make sure to cover the entire area of the leak, extending slightly beyond it to ensure a solid bond. If using a patch, follow the manufacturer’s instructions for application to ensure it adheres properly and provides additional protection against future leaks.
6. Repaint (if necessary)
If your gutters are painted, it’s a good idea to touch up the area around the seam after the sealant has cured. This helps maintain a uniform appearance and provides additional protection against rust, especially in metal gutters. Choose a paint that is suitable for outdoor use and compatible with the gutter material to ensure longevity. Touching up the paint not only enhances aesthetics but also contributes to the overall durability of the gutter system.
7. Regular Maintenance
To prevent future issues with your gutter seams, establish a routine maintenance schedule. Regularly clean your gutters to remove leaves, twigs, and other debris that can accumulate and block water flow. Additionally, routinely check for any signs of wear or damage, such as rust spots or loose brackets. Addressing these issues promptly will help maintain the integrity of the seams and ensure your gutter system continues to function properly, ultimately protecting your home from water damage.
💡 Tips for Maintaining Your Gutters

Regular maintenance is key to keeping your gutters in top condition and preventing future leaks. Here are some essential tips:
- Schedule routine inspections, especially after heavy rain or storms.
- Look for signs of debris buildup or seam damage.
- Clean your gutters at least twice a year, in spring and fall, to prevent blockages.
- Use a gutter scoop or your hands (wearing gloves) to remove debris.
- Flush the gutters with water to ensure proper flow.
- Consider installing gutter guards to minimize debris entry; they allow water to flow freely while keeping leaves and twigs out.
By following these maintenance tips, you can extend the lifespan of your gutters and reduce the risk of seam leaks.
When to Call in a Professional
While DIY gutter repairs are often feasible, some situations warrant the expertise of a professional. If you encounter extensive damage, such as multiple leaks or severely corroded seams, it’s best to consult a roofing contractor like Kenneth Daniel Roofing.
Professional contractors have the experience to assess and address complex issues effectively. They can provide a comprehensive inspection of your entire gutter system and recommend necessary repairs or replacements. Additionally, they have access to high-quality materials and tools, ensuring a durable and long-lasting solution.
If you’re uncomfortable working at heights or lack the necessary tools, it’s safer to hire professionals. Investing in professional services can save you time, prevent further damage, and ensure your home’s protection.
🙌 Protect You Home With Gutter Maintenance and Expert Roofing Services
Maintaining and repairing your gutter seams is crucial in safeguarding your home from water damage. Following the steps outlined, you can tackle minor leaks and keep your gutter system functioning effectively. However, when faced with complex gutter issues or if you prefer peace of mind, trust the experts at Kenneth Daniel Roofing. Our team is dedicated to providing top-notch service, ensuring your roofing needs are met with precision and care. We combine years of experience with high-quality materials to offer solutions that last. Don’t leave your roof to chance—contact Kenneth Daniel Roofing today for a free inspection and let us protect what matters most: your home.
EXPLORE OUR RECENT ARTICLES
We’re Redefining Roofing. You In?
